
v.1.5 User Guide
Updated 2023-02-14
Aurora FM Synthesizer
Most aspects of this synth should be familiar and self-explanatory to those knowledgeable in software synthesizers and FM synthesis. If you don't understand the basics of FM synthesis, there are vast amounts of resources pertaining to the fundamentals of FM synthesis available online. This documentation doesn't aspire to explain those concepts, and so there's an assumption that you understand the concept of carriers and modulators and the roles of the operator frequency and amplitude. Given that, a large part of the parameters and controls in this synth should be completely self-evident and there's little point in explaining them. The other things - those that aren't fundamental, aren't obvious, or are unique to this synthesizer - will be explained in this section.
Controls
Tip: Use the scrollwheel and the modifier keys!
The scrollwheel is the ideal and intended way to use every control in Aurora FM, and the modifier keys do useful things.
In General | ||||
| +Ctrl | changes granularity/speed, faster/slower, depending on context | |||
| +Shift | optional/alternate functionality | |||
| +Alt | extends to related parameter group if there is one | |||
| MMB | randomize | |||
GUI resizing | ||||
 | Click+Drag bottom-right resizing handle | freely resize | ||
| Ctrl+Shift+Wheel | increase/decrease in 5% increments (cursor must not be over a control) | |||
| Double-click Aurora FM Logo | reset to 100% | |||
Sliders | ||||
 | LMB | change value | coarse | |
| +Ctrl | fine | |||
| Wheel | incr/decr value | smallest step | ||
| +Ctrl | by 4 steps | |||
| RMB | reset value | to patch value | ||
| +Shift | to default | |||
| +Ctrl+Shift | to zero | |||
 | LMB | change range value | whichever is nearest the cursor | |
Selection, Toggle/Cycle | ||||
 | LMB / RMB | incr/decr value | single | |
| Wheel | incr/decr value | single | ||
| +Ctrl | by 3 values | |||
| RMB+Ctrl | reset value | to patch value | ||
| +Shift | to default | |||
| +Ctrl+Shift | to zero | |||
Selection, Pop-list | ||||
 | LMB | pop up list | ||
| Click+Drag+Release | pop up list, make selection | |||
| Wheel | incr/decr value | single | ||
| +Ctrl | by 3 values | |||
| RMB+Ctrl | reset value | to patch value | ||
| +Shift | to default | |||
| +Ctrl+Shift | to zero | |||
| Popped | ||||
 | Click+Drag | scroll list freely | ||
| Wheel | scroll list | single | ||
| +Ctrl / +RMB | by 3 values | |||
Osc Freq Numeric Entry | ||||
 | Enter / Tab | apply value and move to next Operator | ||
| Esc | cancel | |||
Envelope Points | ||||
 | LMB | change Time and Level | coarse | |
| +Ctrl | fine | |||
| +Alt | for all operators simultaneously | |||
| +Shift | scale time of all subsequent stages simultaneously | |||
| +Shift+Alt | scale level of all non-zero stages simultaneously | |||
| Wheel | change Time | coarse | ||
| +Ctrl | fine | |||
| +Shift | change Level | coarse | ||
| +Shift+Ctrl | fine | |||
| RMB | reset value | to patch value | ||
| +Shift | to default | |||
| +Ctrl+Shift | to zero | |||
Envelope Loop | ||||
 | LMB | set loop Start or End point | whichever is nearest the cursor | |
| RMB | toggle envelope loop on/off | |||
Key Scaling | ||||
 | LMB / Wheel | change values | coarse | |
| +Ctrl | fine | |||
| LMB+Shift | toggle L/R-slope between linear and exp | |||
| RMB | reset all five values | to patch values | ||
| +Shift | to defaults | |||
| +Ctrl+Shift | to zero | |||
Parameter Locking | ||||
Locked parameters do not change when changing patches, resetting the patch, or randomizing (unless overridden with +Shift). | ||||


| Ctrl+Shift+LMB | lock / unlock single parameter or parameters of subsection (operator, envelope, key scaling) | ||
| +Alt | group of parameters (env slopes, osc mod slot, mod source, effect, mod matrix) | |||
Special: Reset | ||||
 | LMB | reset Patch | ||
| hold RMB, click LMB | reset Part | |||
| (no modifier) | respects Locked parameters | |||
| +Shift | ignores Locked parameters | |||
Special: Randomize | ||||
 | LMB | randomize active Part | ||
| RMB | reset Part first, then randomize | |||
| (no modifier) | respects Locked parameters | |||
| +Shift | ignores Locked parameters | |||
Patch / Part Selectors | ||||
 | Hold LMB | pop up patch / part tree browser | ||
| Wheel | cycle up/down through patches / parts | |||
| (no modifier) | respects Locked parameters | |||
| +Shift | ignores Locked parameters | |||
| Double-click | begin editing text/name | |||
Patch / Part Pop-Lists | ||||
 | LMB | select item | ||
| (no modifier) | respects Locked parameters | |||
| +Shift | ignores Locked parameters | |||
| RMB | up one level | |||
| Wheel | scroll list | by one | ||
| +Ctrl / +RMB | by 3 | |||
| Click+Drag | scroll list freely | |||
| Home/End, Pg↑/Pg↓, ↑/↓ | navigate via keys | |||
| Enter, Space | select | |||
| A-Z, 0-9 | search/advance | |||
Envelope / Operator Copying | |||


| Drag&Drop | click on an empty area of an operator and drag and drop over another envelope control, envelope section, or operator to copy the envelope, envelope+scaling, or operator parameters, respectively | |
Parameter Sections & Groups
Parameter Sections and Groups provide a means of performing the following operations on multiple parameters simultaneously:
- Resetting
- Locking
- Randomizing
Parameter Sections
Parameter sections are determined by the hierarchy of "windows" in the UI (rectangular divisions of user interface display constructs). There are sections for the whole Operator, the full Envelope section (Envelope + Loop + Scaling), the Envelope curve (Envelope), the Envelope loop, and the Key-Scaling controls.
Apply an action to all parameters of a section by performing the operation (mouse + modifiers) on an empty section of the window.
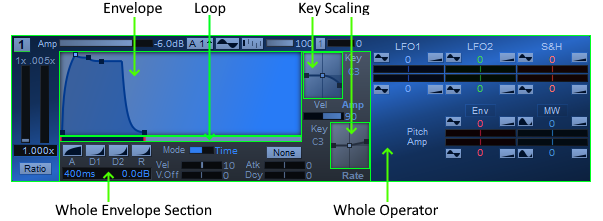
Parameter Groups
Parameter groups are parameters that are logically related.
Apply an action to all parameters of a group by performing the operation (mouse + modifiers) on one parameter within the group and adding the +Alt modifier.
Multi-Op Randomization
Randomization can be applied to the following parameters or parameter groups across all 6 Operators with the addition of the +Ctrl modifier:
- Frequency
- Amp
- Waveform • Sync Phase • Depth
- FB Amt • FB In Op
| Randomize Parameter | MMB |
| Randomize all params in Group | +Alt |
| Multi-Op: extend across all 6 operators | +Ctrl |
Multitimbrality

Aurora FM is now 4-part multitimbral, meaning an instance can now consist of up to 4 different timbres or parts. Parts can be stacked / layered / spread however you like depending on the assigned MIDI channel and Key Range.
What was previously called a Patch is now called a Part, and Patches now consist of 1-4 of these Parts. Parts consist of all the parameters for a timbre, and the Patch only contains:
- The 1-4 Parts
- The Reverb, as a parallel effect, which can be fed by the desired Parts
Click on an unselected Part to make it the Active Part. The controls of the synth edit the parameters of the Active Part.
Note: The Part Level and Pan controls in the Parts list are the same parameters as the Part Level and Pan controls in the main synth window. They've been duplicated to facilitate mixing Parts with respect to each other.
Banks, Patches, Parts, & Sysex
Formats
Aurora FM also loads most Yamaha DX/TX .syx SysEx single patch and 32-patch bank files.
As the Aurora FM synthesis engine is fundamentally completely different than the Yamaha FM synthesizers, the patches are translated/mapped to corresponding Aurora FM parameter values using calculations based on publicized DX/TX parameter ranges and implementation details. The patch translation is respectable but not guaranteed to be 100% optimal in all cases. Aurora FM will inherently never be an accurate emulation of a DX7 or other Yamaha FM synthesizer as that was never the intention - it is not an emulator. Aurora FM has a high-resolution 32-bit float engine employing completely proprietary calculations for all components. (However, if you have quantifiable information on how my translation efforts deviate from the ideal, please don't hesitate to get in touch with me. I would like to make the DX/TX parameter translation as close to accurate as possible.)
By importing Yamaha patches, Aurora FM opens you to the world of thousands of DX7/etc. patches that have been created and circulated over the years. You can use them as-is, or tweak and extend them with Aurora FM's superior precision, modulation, and character.
If a .syx single patch or patch bank fails to load, it's most likely because the file isn't valid, but if you know that Aurora FM is failing to load a valid Yamaha DX/TX patch, please let me know and I'll investigate.
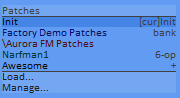
Patch / Part Selector


Click & Hold on the Patch selector/ one of the Part selectors to pop open the navigator / selector.
Double-click on the selector to begin editing the name. When you're finished, hit Enter, Tab, or click somewhere outside of the edit box.
Names are ASCII-only strings up to 32 characters, as allowed by the VST2 standard. If entering a space causes your transport to start and stop, try using Shift+space (this works in Reaper).
Scrollwheel over the selector to increment/decrement the Patch / Part. Every Patch / Part will be accessed sequentially according to its order in the tree of items. The Patch tree structure will be explained next.
The Bank / Patch / Part tree structure
The "Patch Tree" is a tree structure that contains any/all of the following things:
- the Init patch
- the Factory Demo Patches bank (assuming you unzipped it along with the plugin)
- directories:
- subdirectories of the DLL directory if they contain relevant items
- the User Patch Dir, if you've specified one
- banks, patches:
- any Banks or Patches in your DLL directory
- the Host state patch if any
- any new/copied unsaved Banks or Patches that you haven't committed to a file
- and lastly, two commands, Load... and Manage..., that appear in the Patch selector, but not in the Part selector
Similarly, subdirectories will list subdirectories, then Banks, then Patches, in that order.
Click:
Options
There are options pertaining to Patches in the Patch Manager window. Select the Manage... command to open the Patch Manager.
You can override the factory Init Patch with one of your own patches.
If using the factory Init Patch, you can specify how many Init Parts, 1-4, you want it to have.
This is where you specify the location of the directory that you want to use for storing your Patches, Banks, and sysex.
This directory, along with the directory of the plugin DLL, are the two filesystem directory trees that will get fully scanned for Banks and Patches which will be loaded into the Patch tree.
Patch / Part edit state
The Patch / Part edit state is maintained for all Parts, in all Patches, in all the Banks and subdirectories in your Patch tree, until the synth is closed. You don't need to save the changes to a Patch before you load another one. You can switch between Patches as much as you want without losing changes. You only need to save the changes if you want them to persist after you've closed Aurora FM, of course.
There is no dialog warning you about unsaved changes when you exit Aurora FM. It's on you to make sure you've saved everything you need to before you exit.
Your host will save the currently edited Patch if you save your session. It will not save any other Bank / Patch / Part state. That's internal to Aurora FM.
If you want to undo all of the changes you've made to a Patch / Part, you obviously can't do that by selecting it, because you select your edited version, not the version on disk. To get the original back, you need to do a Reset.
 discards any changes made to the Patch or Part, reverting it to its last saved state.
Saving

Click the Save button to pop up a list of actions. Here you can:
Save the current Bank, if the current Patch is in a Bank and the Bank needs saving.
If the current Patch is from a single Patch file and has changes, this saves it.
If the current Patch is from a Bank, saves it as a new single Patch file.
Other Bank / Patch management can be done through the separate Bank / Patch manager.
Load
You can Load a Patch or Bank from anywhere on your filesytem into Aurora FM's Patch tree. It will get added to the tree's root. If the item is from within your DLL directory or User Patch Dir, the item will not be loaded because it already is, you goof!
Part Randomization
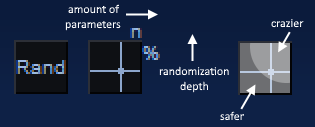
Click on the X/Y grid to randomize the active Part's parameters. The cursor position along the x-axis determines the number of parameters randomized, and the position along the y-axis determines the randomization depth. The higher the depth setting, the greater the possible deviation from the current values and a higher probability for crazier values. Low depths should provide reasonable deviations from the current patch settings that are musically conducive, while higher depths will give crazier and less predictable results.
LMB to randomize.
RMB to perform a reset + randomize.
While the randomizing logic is designed to give musically useful results at low randomization depths, it's not magic and not every randomized patch is a winner. To randomize a patch again, right-click on the control. This will reset the patch before randomizing again.
Randomizing will not affect any parameters that have been locked. To include locked parameters in the randomize operation, Shift+click on Rand.
Patch Manager
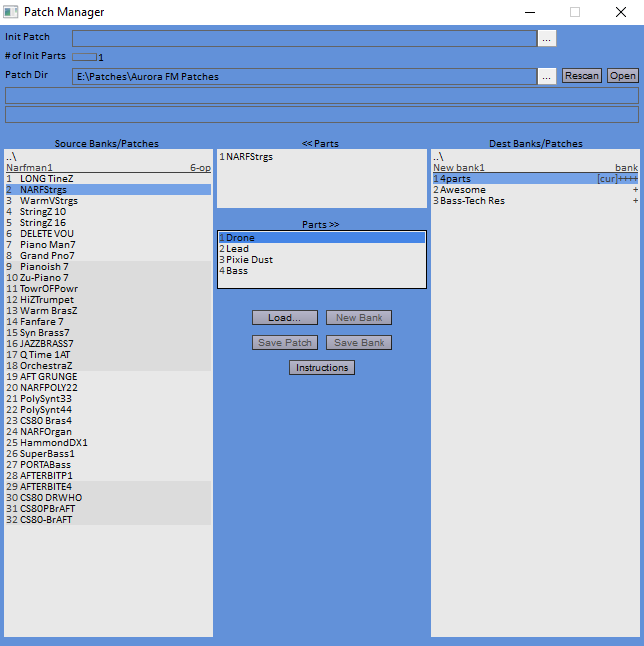
This is the new window for drag & drop Bank management.
The Init Patch override and Patch Dir settings live here.
Editable banks appear in the list on the Destination side. This includes your own user Banks and excludes the Factory Patch Bank.
The entire loaded Patch tree appears in the Bank / Patch Browser list on the Source side just like it does in the main Patch selector.
Double-click a patch to load it.
To get started with your own Patch Bank, you'll first need to click New Bank, then Double-click the new Bank's name to edit it and give it an appropriate name.
From there, select source Patches and drag&drop them into the new destination Bank. The default action inserts the Patch into the next slot under the cursor, or you can hold Ctrl to replace the Patch under the cursor instead.
You can also drag Parts from a Source Patch to a Destination Patch, but realistically you're probably going to compose your Patches from the synth and not from here.
Select a Patch or Part and hit the Delete key to remove it.
Click Save Bank to save the selected Bank to file (afmb format). If the Bank already has a file, it will be saved, and if not, you'll be prompted for the new file name and location.
Likewise, click Save Patch to save the selected Patch to a single Aurora FM patch file (afm format).
Click Load to load any other Banks or Patches that are outside of the plugin DLL directory and User Patch Directory and thus not already in the loaded Patch tree.
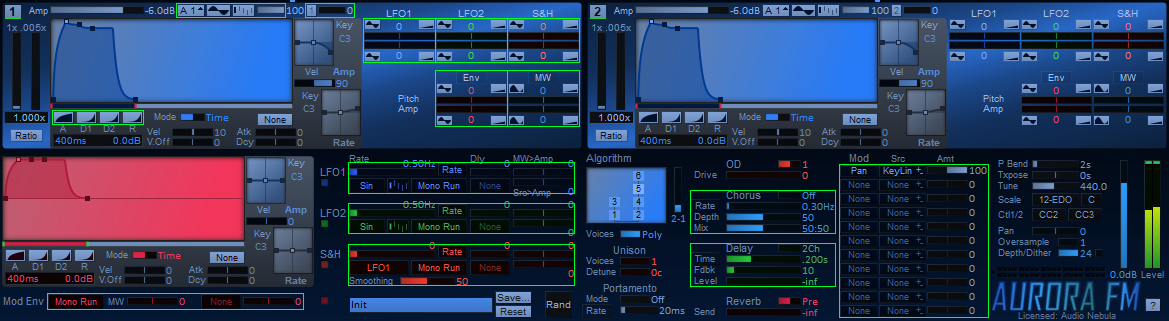
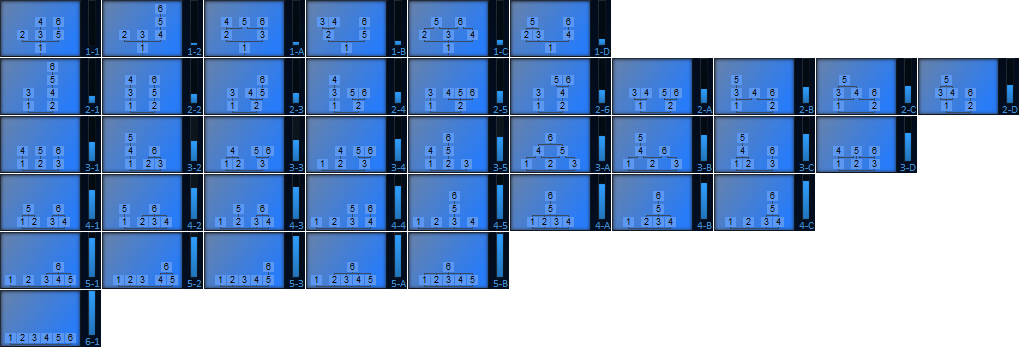
Algorithms
Operators
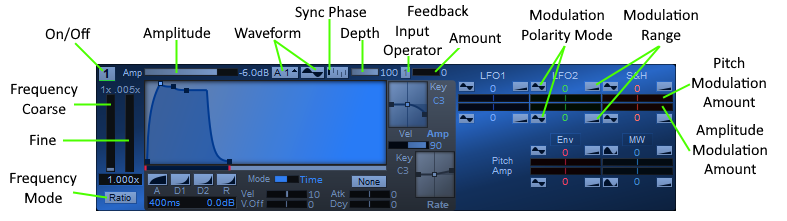
Operators can be turned on and off by clicking (LMB) the operator number control. On =  , Off =
  .
.
Sets the operator's output level in terms of dB relative to full-scale for Carriers and Modulation Index (0 - 14) for Modulators.
Next section.
There are several options for the operator's oscillator waveform synchronization using the parameter Sync Ø : 0°, 90°, 180°, 270°, and None.
With a sync phase of 0, the oscillator will always start from phase 0 and thus generate a sine waveform. A phase of 90° is equivalent to a cosine waveform, and 180° and 270° are the two other potential quadrants of a sine wave 90° apart. Finally, with a sync of None, the oscillator will continue running from whichever phase it previously ended on.
The mode for setting the oscillator's frequency can be one of: Ratio, Relative (Reltv), or Fixed.
Ratio and Fixed are standard in FM synthesizers. The unique Relative mode provides an alternate way of specifying a ratio in terms of semitones (s) and cents (c) relative to the key pressed. A relative value of 0s 0c is equivalent to a ratio of 1.0x, a relative value of +12s 0c is equivalent to a ratio of 2.0x, etc.
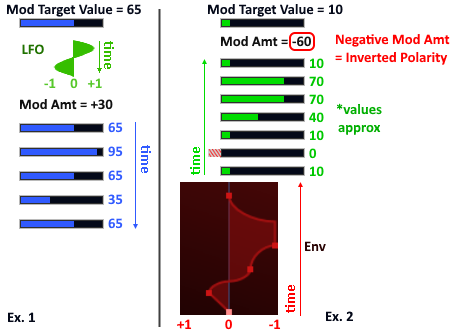
There are three different polarity modes for the modulation of an operator's pitch or amplitude: Bipolar  , Monopolar
  , and Rectified
For inherently bipolar mod sources like the LFOs, S&H, or ModEnv, the modulation occurs as you would expect. Modulation cyclically increases above and decreases below the current pitch/amplitude level.
If the modulation amount is positive  , positive portions of the waveform are increases and negative portions of the waveform are decreases.
If the modulation amount is negative  , this is reversed, so that positive portions of the waveform are decreases and negative portions of the waveform are increases.
For the ModWheel - which is normally considered to be monopolar, starting at 0% and only able to make increases - bipolar modulation means treating the ModWheel as if it's centered at the 50% point, so between 50% and 100% it gives a positive output and between 0% and 50% it gives a negative output. A positive modulation amount will reflect this, while a negative modulation amount will invert this.
For bipolar mod sources, instead of modulating above and below the current pitch/amplitude, the modulation range is shifted so that it's only an increase or a decrease. Positive modulation amounts are increases and negative modulation amounts are decreases.
For the ModWheel, this is the standard operating mode, since the ModWheel is typically considered monopolar.
In this mode, the source waveform is rectified - its negative portions are inverted to also be positive, just like how AC is rectified into DC. This mode makes the most sense with a Sine LFO wave (it will also essentially double the modulation rate), while it doesn't make much sense with a Square wave.
The modulation range controls ( ,
,  , and
, and  ) are used for providing a usable granularity for selecting the amount
of modulation you want - low, medium, and high. For pitch modulation, the range maximums are (+/-) 120 cents, 12 semitones, and 48 semitones.
For amplitude modulation, the range maximums are (+/-) 6dB, 20dB, and 40dB. These range options allow for a different minimum increment amount for each range. Small modulations for vibrato are typically less than a few dozen cents and small tremolos might be a few dB, but heavy tremolo and wild effects may need dozens of dB or several octaves. If there was only a 48 semitone range and we wanted 1 cent granularity, there would be 4800 increments just for one polarity of the control, making it very difficult to quickly set a specific amount using the mouse and scrollwheel.
) are used for providing a usable granularity for selecting the amount
of modulation you want - low, medium, and high. For pitch modulation, the range maximums are (+/-) 120 cents, 12 semitones, and 48 semitones.
For amplitude modulation, the range maximums are (+/-) 6dB, 20dB, and 40dB. These range options allow for a different minimum increment amount for each range. Small modulations for vibrato are typically less than a few dozen cents and small tremolos might be a few dB, but heavy tremolo and wild effects may need dozens of dB or several octaves. If there was only a 48 semitone range and we wanted 1 cent granularity, there would be 4800 increments just for one polarity of the control, making it very difficult to quickly set a specific amount using the mouse and scrollwheel.
Waveforms

Aurora FM has 13 base waveforms, 5 waveform variants, a waveform Depth amount, and a Polarity (normal / inverted).
Base Waveforms
Wave Variants
Controls the linear interpolation between a sine wave at 0 depth and the complex waveform selected at 100 depth.
Depth is a moddable parameter and appears in the Mod Matrix as Op# Dp, where # is the operator number.
The waveforms in Aurora FM are not bandlimited. Playing high notes with a waveform with lots of harmonics can result in aliasing. One technique to minimize aliasing is to modulate the waveform Depth by Key so that progressively higher keys output a lower Depth value and thus have less harmonic spectral energy to alias. Another solution is to employ Oversampling.
Some combinations of waveform and variant are monopolar or asymmetric, meaning when used as carriers they can result in a DC offset. If you have two carriers that are each using a waveform that has amplitude in only one polarity, you could set one to positive polarity and the other to negative polarity to make the output bipolar and minimize the DC offset.
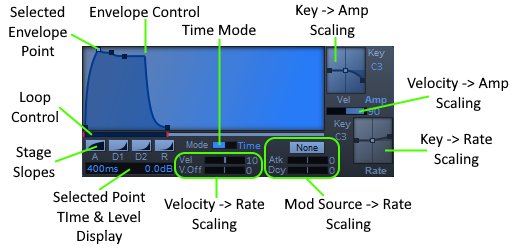
Envelopes
The 6 operators' envelopes and the single modulation envelope (ModEnv) are very similar, with the only difference being that the ModEnv is a bipolar envelope (contains positive and negative poles) while the operator envelopes are regular monopolar envelopes.
The envelopes have six stages: Delay, Attack, Decay1, Decay2, Sustain, and Release.
Each stage with a varying level (this excludes Delay and Sustain) has the option of one of 9 slopes:
The stage times are set as fixed times in the range of 0 ms to 20 s.
The stages are synced to the tempo and have times corresponding to any note length from one 32nd note to four whole notes.
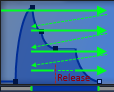
The Release stage is special and requires explanation:
The Release level does not have to be 0 (-inf). If you set the Release level to a non-0 level, the envelope will hold at that level once it reaches it. You must understand the implications of this! For modulators, this isn't a problem, but for carriers, this will cause the voice to hold indefinitely and never complete.
Also, you'll notice that setting the Release level to a non-0 level causes the Starting level at the Delay time point to be set to the same level. This means that after the Delay time has elapsed (if any), the level will immediately jump to the level set by the Release level and then the Attack stage will begin from that level.
This functionality exists for compatibility with the Yamaha DX7, as that's how the DX's envelopes operate. You must use it at your own discretion and understand what's happening.
To force indefinitely sustaining carriers to complete, you can toggle the operator off and on... but you probably shouldn't ever make use of non-completing carriers!
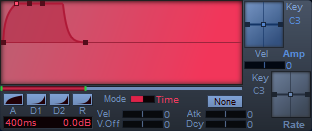
The Release time, when set to Time mode (as opposed to Sync mode), isn't actually a fixed time, but rather it's a release Rate, with a value between 100 (fastest) and 0 (very slow). There are several reasons for this:

The envelope can be at any level when the key is released, not necessarily just the Sustain level. Therefore the amount of level change that needs to happen during the Release is variable. By using a rate instead of a fixed time, release behaviour more closely matches the acoustic behaviour of real sounds. Most natural sounds decay at fixed rates and thus the decay times are proportional to the level - louder sounds take longer to decay, quieter sounds decay more quickly. Therefore the level of the envelope at the time of release will determine how long it actually takes the Release stage to complete.
This is how the DX7's envelopes operate. In fact, it's how every stage of the DX's envelope operates; but in this synth, only the Release is treated as a Rate while the other stages are treated as fixed times. This was necessary to preserve compatibility with the DX7. Since we cannot know in advance which level an envelope will be at when a key is released, it would be impossible to accurately predetermine the length of a Release stage, and thus it would not be possible to properly emulate the Release characteristics of a DX envelope. Only by preserving the intended Rate as opposed to pre-calculating a fixed time is it possible to maintain the same characteristics. The other envelope stages do not have this concern because their levels are known in advance and the stage times can't change based on things like when a key was released.
The envelopes are optionally loopable. Set the envelope loop start point and loop end point to any of the stage points. Changing a loop point will automatically turn on envelope looping. To toggle envelope looping on and off, RMB anywhere in the loop indicator.
Looping On. Looping Off.
 |
When an envelope loop spans the Sustain stage, the Sustain stage will be omitted. This behaviour is necessary to allow looping - without it, the envelope would hold at the Sustain level and never be able to actually loop. The envelope will only loop between the loop start and end points. A looping envelope will:
|
Envelopes' Amplitudes can be scaled by Velocity and Key, and Rates can be scaled by these as well as an additional modulation source.


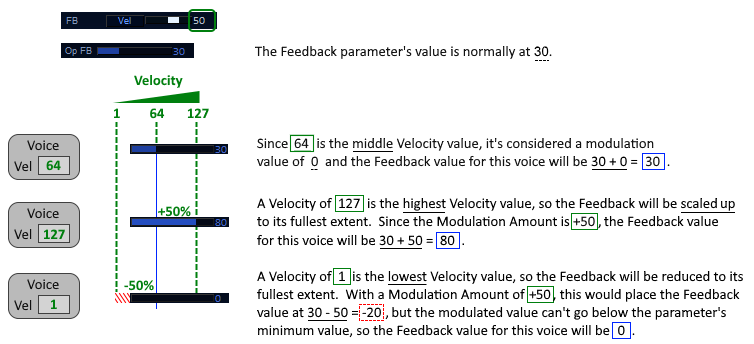
Use the Vel control in the Amp section to set the Velocity>Amp scaling, and in the Rate section to set the Velocity>Rate scaling.
The Velocity>Rate scaling has two different parameters, one for Velocity On (Vel) and a separate one for Velocity Off (V.Off). Release/note off velocity is a useful but often neglected MIDI performance control.
By setting this parameter to a positive value, the amplitude will increase and rate will increase (the envelope will progress through its stages more quickly) as you play the key with more velocity, and they will decrease as you play with less velocity. By setting this parameter to a negative value, this effect is inverted - higher velocities result in lower amplitudes and slower rates, and lower velocities result in higher amplitudes and faster rates.
The midpoint velocity value is 64. Velocities greater than this are considered positive and below this are considered negative.


The Key scaling controls have a bit more depth. With these controls, as opposed to having a single value, there are five separate parameters:
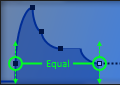
- Breakpoint Key
- Left Amount and Right Amount
- Left Slope and Right Slope
Sets a key that splits the key range into two halves. The keys left of the breakpoint will get one amount of scaling, and the keys right of the breakpoint will get another amount of scaling.
By setting a positive amount for that side of the split, you are increasing the amplitude or rate of the envelope for notes as they get further away from the breakpoint, and by setting a negative amount for that side of the split, you are decreasing the amplitude or rate of the envelope for notes as they get further away from the breakpoint.
The scaling can be applied with a linear slope or with an exponential slope.

An additional modulation source can be used to scale/modulate the envelope rate, and different scaling amounts can be applied to stages that increase (Atk) and to stages that decrease (Dcy) in level.
Modulation
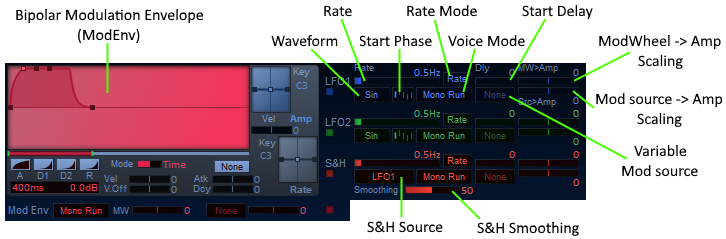
There are four primary, complex modulation sources - two LFOs, one Sample-and-Hold generator (S&H), and one Modulation Envelope (ModEnv) - as well as three scalar modulation sources: Velocity (On and Off), Key, and the ModWheel.
Sine, Triangle, Square, Saw Up, Saw Down
0°, 90°, 180°, 270°
LFO1, LFO2, ModEnv, Random
LFO1+LFO2, LFO1+Env, LFO1+Rand, LFO2+Env, LFO2+Rand, Env+Rand
The primary mod sources operate in one of two modes: monophonic (shared by all voices) or polyphonic (each voice has its own). Additionally, these mod sources can be perpetually free-running or they can be reset each time a new key is played.
Thus, there are three Voice Modes:  ,
,  , and
, and  .
.
The mod source is shared by all voices. Its waveform is started/reset to the beginning when 1) the patch is changed, or 2) the transport in your sequencer is started, and it will continuously free-run from then on.
The mod source is likewise shared by all voices, but instead of perpetually free-running, it will be reset to its starting point each time a new key is played. The waveforms of the LFOs always start by going positive first as expected.
Each voice has its own instance of the modulation source. When a key is played, that voice's modulation source begins running from its starting point and runs until the voice finishes.
The mod source rate is set as a frequency in the range of 0.0 Hz to 60 Hz.
The mod source's rate is synced to the tempo and has a frequency corresponding to the period of any note length from one 32nd note to four whole notes.
The Delay parameter for the LFOs and S&H determines how much of a delay there is before the mod source outputs its full amplitude to the voices. Note that in the case of resetting, the reset always happens when the key is pressed and the delay time does not affect when the reset occurs. Furthermore, when the delay parameter is used, the mod source doesn't immediately kick in after the delay expires; instead, the mod source's amplitude will ramp up for up to one second before the delay time ends. So for example, if the delay time is 0.5s, the modulation output will immediately begin ramping up and after 0.5s it will be at full amplitude; if the delay time is 2.1s, there will be no mod source output for 1.1s, and then its output will ramp up from 1.1s to 2.1s and be at full level after that.
When the input source of the S&H is either of the LFOs, the LFO's Delay time is ignored and the S&H output is governed by its own Delay parameter.
(MW & variable Source)
MW>Amp controls the ModWheel>Amplitude scaling. At 0, the ModWheel has no influence on the mod source output (amplitude). At 100, the mod source amplitude is fully governed by the level of the ModWheel, so if the ModWheel's at 0% then there will be no mod source output, and as the ModWheel is moved up to 100% the amplitude of the mod source will likewise increase to its full amplitude. For amounts between 1 and 99, there will always be some mod source output regardless of the position of the ModWheel and the ModWheel will only control a portion of the mod source's output level. With negative values, this effect is inverted, so at -100 the mod source output will be maximal with the ModWheel at 0% and it will decrease to nothing as the ModWheel is moved up to 100%.
Src>Amp operates the same way on the Variable Mod Source of your choosing.
Output from the LFO's is band-limited / smoothed to avoid nasty artifacts when modulating a parameter directly tied to the audible signal (example: the sharp transition of a non-band-limited square wave introduces an audible tick when modulating an operator's amplitude). However, the Sample and Hold takes the UNsmoothed output from the LFO's as its input. The Smoothing control allows you to choose how much or how little smoothing you want applied to its signal sampling.
Effects
The effects section is applied in series in the order Overdrive > Chorus > Delay to the summed output of the synth voices, before the Part's master output level.
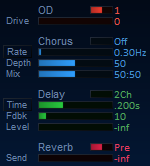
More extreme, balanced harmonics.
Amount.
Algorithms 1-4 are slight differences in the Chorus effect pertaining to the feedback/feedforward ratios. The Rate and Depth parameters are exactly the same regardless of the algorithm.
Rate / Sync.
The rate of the LFO that modulates the length of the chorus's delay.
The depth to which the chorus's delay length is modulated by the LFO.
A Dry:Wet ratio control for setting the mix between the dry input signal and the wet, modulated delay output. A typical fixed-level chorus effect would be somewhere between 40:60 and 60:40.
Mono Ping-pong
Time / Sync.
Either a fixed time from 0.02s to 5.0s, or a tempo-synced time from one 32nd note to four whole notes.
(Note: the longest note sync option available will depend on the host tempo and the maximum delay time of 5s).
Controls the delay's feedback gain and thus the number of delay repetitions. A Feedback of 100 will repeat indefinitely.
The level of the Delay effect (pre-Master output level).
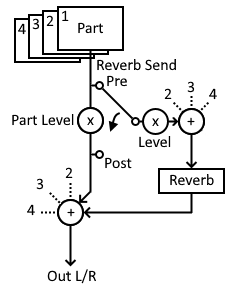
Whether the output sent to the Reverb is before (Pre) or after (Post) the Part's output level fader.
The amount of Part output sent to the parallel Reverb effect.
The Reverb is a parallel effect, fed by the pre-fader or post-fader output of the Parts and mixed with the summed Parts output at the very end of the signal chain.
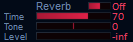
Off/On
The length of the reverb decay. Non-quantified RT60 - you'll need to set by ear.
A classic tone tilt control. Negative values attenuate the high frequencies and positive values attenuate the low frequencies.
The amount of Reverb output to be summed with the dry output from the Parts.
Output
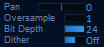
The Left-Right position of the Part in the stereo output.
There is also a post-master output level output bit depth reduction and dithering stage.
8 - 24 bit output. 24 is actually a misnomer: it's the full, unrestricted dynamic range of the synth engine. At 23 and below, the output is truncated to the specified bit depth.
Off/On. No effect when Bit Depth is 24. Otherwise, filtered random noise dither is applied to the truncated output.
Performance
Up to 64 voices. Voice-stealing of oldest voice in its Release stage.
Polyphonic, but repeated notes reuse the same voice. Keeps polyphony and CPU usage down and avoids issues from summation of nearly identical signals.
When a new note is played legato (ie. with the current note still held), the envelope doesn't retrigger and the voice's pitch is simply changed. If not playing legato, this mode is no different than Mono.
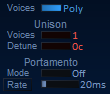
When set above 1, provides extra voices playing the same note with slightly tweaked characteristics, giving a fatter sound.
The extra voices have slightly different amplitudes for all operators, leading to slight tonal differences, and don't use oscillator phase syncing, helping to make the periodic beating effect that comes from two close-but-not-identical frequencies less predictable.
With only 1 voice, this acts as a detune parameter for all 6 operators.
With 2-4 voices of unison, this controls the extent of the detuning that is spread across the extra voices.
This effect works best in Mono mode. In Poly mode, since portamento glides from the voice's previous note's pitch to the new note's pitch, the effects are rather unpredictable.
Off
Portamento always in effect.
Only applicable to Mono voice mode. Portamento only applied if a note is being held/sustained when the new note is played.
A fixed rate, ie. time per octave. The larger the difference between the starting pitch and the new note's pitch, the longer the glide.
A fixed time. The amount of pitch change is irrelevant.
Also a fixed time, but synced to tempo.
The time (Time, Sync) or rate (Rate) (time per octave) of the portamento effect. Approximately 1ms (or 1ms / octave) to 1s (or 1s / octave).
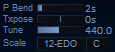
Pitch Bend Range (P Bend), Transpose (Txpose), and Tune should be pretty self-explanatory.
There are a variety of alternate temperaments and non-traditional scales available:
- 12-EDO - aka. 12-TET, 12-tone equal division of the octave, 12-tone equal temperament, etc. The one you know.
- Just Intonation 5-limit symmetric 1/2/asymmetric
- Just Intonation 7-limit
- Harmonic
- 15-/17-/19-/22-/24-/31-EDO
- Bohlen-Pierce
- MTS-ESP - microtuning via ODDSound's MTS-ESP client
You can research these tunings to understand the theory behing them and what they accomplish.
The Key selector, representing a key from MIDI note 60-71 (C->B), is used to specify at which key the scale is anchored to the corresponding pitch in 12-EDO. All keys above and below that will derive their tunings from the selected scale. (Does nothing in 12-EDO scale.)
Mod Matrix

There are slots for up to 11 extra modulation routings for modulation destinations that haven't been given their own dedicated controls in the GUI.
Any of the listed destinations can be modulated by any of the listed modulation sources.
Destinations
Sources
| Unison | 1 | 2 | 3 | 4 |
| Voices | Mod Values | |||
| 1 | 0.0 | |||
| 2 | 1.0 | -1.0 | ||
| 3 | 1.0 | 0.0 | -1.0 | |
| 4 | 1.0 | 0.33 | -0.33 | -1.0 |


The intensity and polarity/direction of the modulation - the range over which the target parameter's value will change depending on the modulation source's output.
Positive modulation amounts - cause positive mod source output values to increase the target parameter's value, while negative output values decrease the target parameter's value.
Negative modulation amounts - the inverse effect - positive mod source output values will decrease the target parameter's value, while negative output values will increase the target parameter's value.
Modulation Basics
A primer for beginners. You probably know this already. Included for thoroughness.
The primary modulation sources -- LFO's, S&H, ModEnv -- have continuously-variable bipolar (1.0 to -1.0) output values that change over time.
Key (KeyLin, KeyExp), Velocity (Vel On, Vel Off, Vel), and the Random values (? On, ? Off, ?) are scalar values that stay constant for their duration.
The ModWheel (MW), Aftertouches (AT C, AT P), and CC's are controlled directly by the user and are thus realtime continuous values.
For continuously variable mod sources, they will affect the modulation target continuously, increasing or decreasing the mod target's value continuously within its modulation range over time. Scalar mod sources will just increase or decrease the mod target's value to the extent set by the modulation amount and keep it there.
With a small modulation amount (range) set, the mod target's value will only increase above and/or decrease below its starting/unmodulated value a little bit. As the modulation amount is increased, this range grows larger and larger. With the modulation amount at 100%, the mod target's value can deviate between its minimum and maximum possible values (either fixed or continuously depending on the type of modulation source).
Examples:
Techie Stuff
Aurora FM is non-bandlimited. It's entirely possible to create nasty aliasing with high modulation indexes (modulator amplitudes) or the modulation of high frequency modulators or carriers. It should be totally possible to get the high frequency content you want without being impeded by aliasing though. The control is entirely in your hands. You can determine your own threshold for how much aliasing is acceptable.
As mentioned previously, the LFO's ARE band-limited. This is absolutely mandatory for having square waves and saws that can be used to modulate amplitude, pan, effect levels, and other directly audible output signal-affecting parameters without horrific ticks and distortion artifacts.
The sine generators use approximate sine routines with very low error - about -85dB average error and -75dB worst case error. You will see some very low level harmonics on a spectrum analyzer.
Yes, the overdrive effect aliases. That sucks, I know. I plan to research an alternative overdrive design at some point if I get the chance... Obviously you'll use a better overdrive when it matters.
I'm no DSP or reverb expert, and yet I think the reverb's pretty decent! I'm kind of happy with the results of my first crack at such a thing. It's been one of the most fun and engrossing parts to work on too. I've compared it to many commercial reverbs, some costing $$$, and think it holds up quite well. Of course it could still be even better, but for the time being it's good enough for an included reverb.
Things I want to add, if given the opportunity (ie. I can make enough from sales to avoid destitution...):
- Arpeggiator
- Step sequencer / step modulator
- Conversion to VST3
- External audio-in for operator waveform
- Morphing - define A/B parameter values on any desired parameters for user-controlled morphing between them
- ...